How to Solve Crimping Issues
Crimping Issues 101
Are crimping issues making your buttons ugly? Do you have bubbles under the Mylar? Or, is the Mylar pulling away from the edge of the button? Well, today you will learn what causes and, more importantly, how to solve these particular crimping issues. As I mentioned earlier regarding printing buttons using a laser printer, I have for you not one but two ingenious solutions. That’s right. I said two solutions to one problem. At ABM we’re all about choices. When printing graphics from a laser printer you’ll need to be aware this may lead to some crimping issues. Wax in some toners may cause the Mylar to slip during the button making process. Darker colors seem to cause the most problems. But it can vary by toner manufacturer. Slippage caused by the toner can result in bubbles under the Mylar around the edge of the button. Not to mention the aesthetics factor. Bubbles do not a pretty button make. And even worse, this issue can lead to Mylar being pulled completely away from rectangle buttons. 
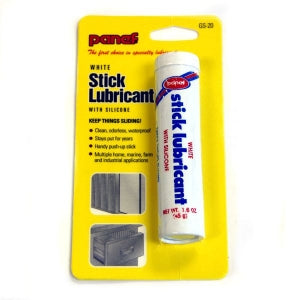
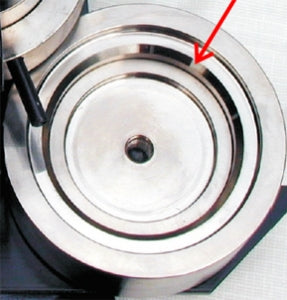
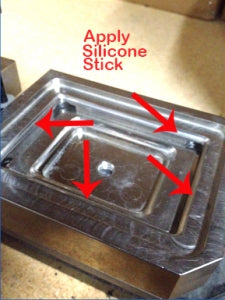
There are two ways to solve this issue. The first is to reduce the print area by .125” all the way around the outside edge. If you’ve already printed graphics with a full bleed (print covering the entire paper cutout from one edge to the other) a silicone stick will help eliminate the problem. Silicone sticks can be found online, on our website and are included with all 2x3 button makers. How to Apply: Massage the silicon all the way around the tapered edge of the crimp die. IMPORTANT: Apply Only to the Tapered Edge. This is the area causing the Mylar to slip on the graphic and not wrap correctly. By applying the silicone in this manner the edge becomes less resistant and allows the Mylar and graphic to fold perfectly in the back of the button.
 |
 |
|---|---|
| Where to apply silicone stick on a round button maker | Where to apply silicone stick on a rectangle button maker |
You may find yourself tempted to use WD-40 or other sprays on the die. Please resist! Oil or grease from these types of sprays can leave a residue on the die and ruin your graphics. It can also cause a vacuum inside the dies making for defective buttons. For this purpose, a silicon stick is always the best & most effective lubricant to use. Until next time – Happy Button Making! By Brighid Brown, Director of Blogging and All Things Cool at ABM
Share this post
2 comments
Thank you so much for posting these solutions. I was freaking out a bit that my machine was broken when the mylar started leaving gaps, but it was the first time I’d used a laser printer. Leaving a border didn’t help much for me, but stick lubricant did the trick! I needed it right away for an event, so I got the lubricant on Amazon. I LOVE my ABM button machines!
Thanks for the tip about laser printing. I have been getting so frustrated wasting buttons. Hadn’t come across this tip before, Solved most of trouble. Any idea where I can buy silicone stick in Australia so I don’t pay a bomb in postage or wait weeks for delivery?