
Button Machine Beginner's Guide
Let's Make Your First Button
Welcome! You just opened your kit, and this guide walks you through it start to finish. It covers every ABM machine and cutter, so wherever they differ, just open the block that matches what you have.
What's In Your Box
Get to know the parts and what each one is called. Your printed graphic always sits between the front shell and the clear mylar. Open your machine type:
1″ Machine collet system + separate pin
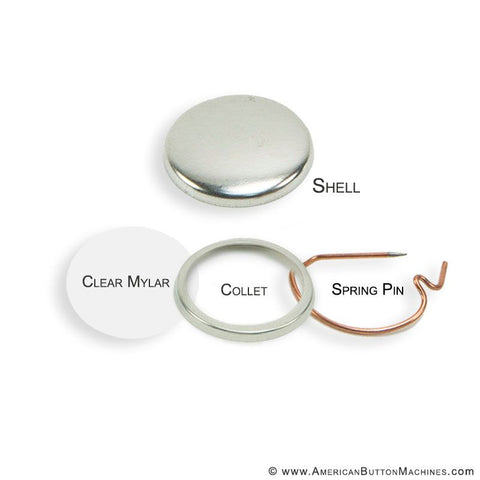
- Front ShellThe metal top loads sharp edges down into the shallow die.
- Graphic + Clear MylarYour art picture-side up, then the mylar on top.
- Collet BackThe 1″ back. Sharp side up in the deeper side.
- SpringpinA separate piece that slides into the collet by hand after pressing. No glue.
All Other Machines 1.25″–3.5″ · pre-pinned backs
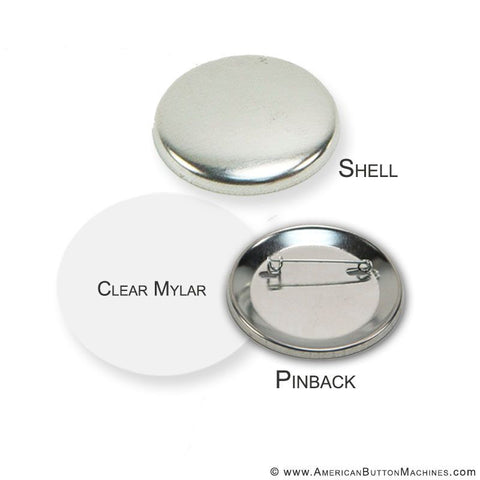
- Front ShellThe metal top loads sharp edges down into the shallow die.
- GraphicYour printed art, picture-side up.
- Clear MylarThe thin clear disc that protects your art.
- Pre-Pinned BackOne piece, with the pin already attached. Sharp edges up into the deeper die.
Know Your Machine
Four parts to learn, and that's the whole press.

-
1HandlePull it down to press. All your power comes from here.
-
2Upper DiePresses straight down from the top.
-
3Pickup Die (shallow, on the right)Holds the shell, graphic and mylar.
-
4Crimp Die (deep, on the left)Holds the back. The platform swivels between Pickup and Crimp.
How to Cut Your Graphics
Print your art, then cut it to size. Your circle is cut a little larger than the finished button so the edge wraps the shell.
Graphic Punch table-top press-down
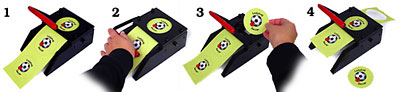
- Insert your printed strip and center the image in the window.
- Press the handle straight down until the punch goes all the way through.
- Remove the cut circle and set it aside.
- Pull through to the next image and repeat.
 Watch: Using Your Graphic Punch
Punches cut one graphic at a time and won't cut card stock or anything thicker than photo paper. Jammed? Run a playing card through front-to-back to clear it. Shop graphic punches →
Dynamo Hand-Held Punch squeeze-style

- Slide your printed strip into the Dynamo's slot.
- Line up your image in the centering window so the cut lands where you want.
- Squeeze the handle firmly to punch a clean circle.
- Release, remove the circle, and slide to the next image.
 Watch: Using the Dynamo Punch
Great for cutting on the go. Shop Dynamo punches →
Adjustable Circle Cutter swivel-blade

- Set the size for your button. Templates start at 1″, so follow the cutter's instructions to enlarge.
- Line it up — start by lining up the image in the template window with your sheet.
- Push the handle down and cut in a circular motion.
- Lift out your cut graphic and repeat.
 Watch: Using Your Circle Cutter
Make a Button
Watch it once, then follow the steps. Remember: shells load sharp-edges down, backs sharp-edges up, and only one piece goes in each die. Open your machine type:
1″ Machine collet + hand-set pin
 Watch: How to Make a 1″ Button
- Open the press. Lift the red handle and point it away from you; swivel the die open. Pickup (shallow) die on the left, Crimp (deep) die on the right.
- Load the Pickup die. Front shell sharp-edges down, then graphic picture-up, then clear mylar. Top of the graphic at 12 o'clock.
- Load the Crimp die. Place the collet in, sharp-edges up (instead of a pinned back).
- First press. Rotate the Pickup die clockwise under the upper die; pull the handle down and raise.
- Second press. Rotate the Crimp die counter-clockwise under the upper die; pull the handle down and raise. Rotate clockwise and remove the button.
- Add the pin by hand. Slide the spring pin into the collet. It snaps in, no glue.
All Other Machines 1.25″–3.5″ · pre-pinned back
 Watch: How to Make a Pinback Button
- Open the press. Lift the red handle and point it away from you; swivel the die open. Pickup (shallow) die is on the left, Crimp (deep) die on the right.
- Load the Pickup die. Front shell sharp-edges down, then graphic picture-up, then clear mylar. Tip: top of the graphic at 12 o'clock.
- Load the Crimp die. Pre-pinned back, sharp-edges up. Tip: top of the pin just right of 6 o'clock, since the upper die shifts slightly as it rotates.
- First press. Rotate the Pickup die clockwise under the upper die. Pull the handle all the way down, then raise it.
- Second press. Rotate the Crimp die counter-clockwise under the upper die. Pull the handle down, then raise it.
- Release. Rotate clockwise and lift out your finished button. Flip it over and the pin is ready to wear.
Tips for Great Buttons
A few habits that save every beginner a pile of scrap.
Do
- Use 24# bond paper (inkjet is the easiest, most trouble-free).
- Load one piece per die: shell up top, back down below.
- Pull the handle all the way down each time for a tight crimp.
- Keep a magnet nearby to separate nested shells.
Don't
- Don't use card stock or anything thicker than standard printer paper for 1″–2.25″ machines, or photo paper for 3″–3.5″ machines.
- Don't force the handle if the die won't rotate. Clear it first.
- Don't stack two graphics or two backs in one die.
- Don't skip the mylar. It's what protects your art.
Using a laser printer and seeing bubbles at the edge? Toner can trap air. Reduce your bleed by about .125″ or run a silicone stick on the die, or just switch to inkjet.
Common Issues
Most hiccups have a one-line fix.
| If this happens | Try this |
|---|---|
| Bubbles under the mylar | Usually laser toner. Switch to inkjet, shrink your art's bleed by ~.125″, or run a silicone stick on the die. |
| Crimp feels loose | Tighten the machine bolts and use 24# paper. When tightening, only tighten the outside top bolts (the black ones, not the silver). A loose crimp is almost always under-pressing or thin paper. |
| Die won't rotate / shell stuck | Don't force it. A shell has likely nested in the die. Remove it with a magnet, then continue. |
| Graphic punch jammed | Run a playing card through the punch front-to-back to push the trapped paper out. Keep the cutter clean. |
| Paint flaking on a new machine | Normal and cosmetic. It happens where the handle meets the rollers and won't affect your buttons. |
 Watch: How to Unjam a Button Maker
Care & Maintenance
A little upkeep and your press lasts for years.
- A little grease is normalThe dies need some grease to rotate smoothly and the punch handle to move freely. If excess gets on the base or in a die, wipe it off with a soft cloth.
- Keep dies and cutter cleanBrush away paper dust and bits. A silicone stick helps the mylar seat cleanly if you print on a laser.
- Press fully, every timeFull strokes keep crimps tight and prevent half-made buttons.
- Stiff on the first use?When your machine first arrives the grease can be firm, so the first rotation may take extra force. Give it a firm push, or let it sit for about an hour to loosen up, and it will turn smoothly.
Frequently Asked Questions
The ones we hear most from new button makers.
Do I need special paper to make buttons?
Do I really need a graphic cutter?
What size does my graphic cut to?
Why are there bubbles under my mylar?
IMPORTANT: Apply only to the tapered edge. This is the area causing the mylar to slip on the graphic and not wrap correctly. By applying the silicone in this manner, the edge becomes less resistant and allows the mylar and graphic to fold perfectly in the back of the button.
My crimp feels loose. What's wrong?
The die won't rotate or a shell is stuck.
What is the crimp die adapter for? (1″ machines)
Is the paint flaking off my new machine a problem?
What Else Can You Make
Same machine, new product. Just swap the back.


Video Library
Real projects, start to finish. Each opens on YouTube.
 Fridge Magnets
  Keychains
  Magnetic Jewelry
  Photo Buttons
  Bottle Openers
  Purse Mirrors
  Coasters
  Accent Rings
  Fabric-Covered Buttons
  Ways to Make Money
Swipe for more · See the full Video Library →