How to Make a Mirror Back Button
Making a mirror button is fun and very easy to do! You might have heard them referred to before as a pocket mirror or purse mirror. You can make your own custom mirrors with ease using our 2.25", 3.0" or 3.5" mirror button sets and of course a button maker. Looking for 2.25" Badge-a-Minit sized mirrors, we have them too. Our mirrors are made with the highest quality button parts including the cheapest shipping charges and best customer service available.
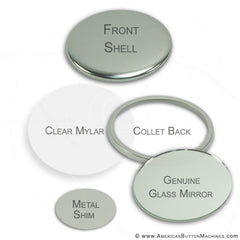
Our complete mirror sets include everything you need to make a mirror back button, Mylar, Front Shell, Collet Back, Mirror Shim and Genuine Glass Mirror.
We offer several sizes to choose from: Industry Standard Size: 2.25" Mirror Button Set, 3" Mirror Button Set and 3.5" Mirror Button Set. Badge-a-Minit Size: BAM 2.25" Mirror Button Set We have put together this step-by-step tutorial to guide you through how to make a mirror back button.
|
Step 1: Place the shell, graphic & mylar into the left pickup die.
|
Step 2:Place the collet (sharp side up) and mirror (reflective side down) into the right crimp die.
|
Step 3: To prevent movement of the mirror in the finished button, place a bent shim into the right crimp die.
|
|
Step 4:Put as much of a v-bend in the shim as you can that still allows it to clear the upper die.
|
Step 5:Rotate the die fully clockwise, press the handle all the way down and then raise it back up. Rotate the die fully counterclockwise, press the handle all the way down again and then raise it back up.
|
Step 6:Remove the finished button. Making more than one mirror? Go back to step 1 and repeat as necessary.
|


